After adding some new SSD storage to my home server I had purged a lot of the older VMs that I didn't use frequently in my previous 'Spring Cleaning' effort to make space. One of the VMs that I had purged but now wanted to get back online and running was a Security Onion VM. I won't go into much detail here about SecOnion, there is a lot of good documentation and tutorials already out there on how to set it up. Security Onion requires at least two network interfaces; one for administrative control, and at least one more that ingests the network traffic. The second+ NIC will be set to promiscuous mode in the OS and the actual hardware switch port should be set to SPAN or MIRROR (whatever your manufacturer calls it).
Switch Configuration
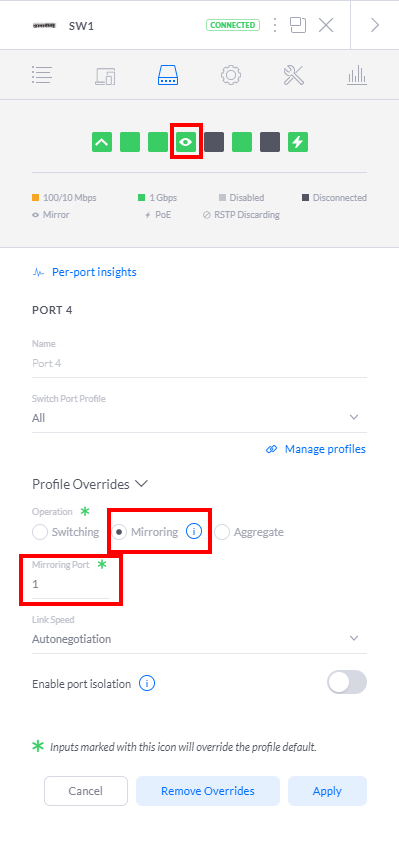
For my home network I'm using a variety of Ubiquiti devices. I have an EdgeRouter Lite -> Unifi Switch 8 POE-60W -> UniFi AC Pro AP. I can't say enough how impressed I am overall in the performance and quality of the devices. I found them intuitive to configure and offer the enterprise class features that I wanted for my lab. To configure the switch, I open the devices settings in my self-hosted unifi controller and select the port I want to do the mirroring on. I'll be making port 4 mirror port 1 which is my router -> switch connection. Switch Port 4 is already connected to a seperate network card on the Proxmox server. Thats all we need to do to configure the switch for mirroring. Easy!

Proxmox Configuration
The Proxmox configuration was more difficult to figure out (hence this article) and is only partly doable using the web GUI. I'll present both here, but I think the command line version is much faster since you must use it anyways.
GUI
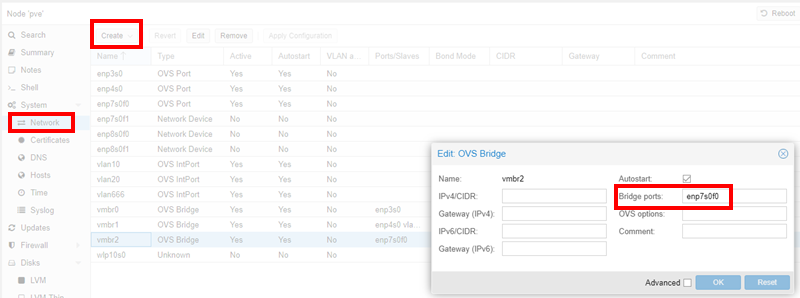
To start out, open the Proxmox web interface and navigate to the node's network page. Create a new OVS Bridge and in the "Bridge Ports:" section add the NIC that has the mirrored traffic. Click create and then reboot the server for the network changes to be created. From here you will need a shell on the server.

Command Line
As a root user open your /etc/network/interfaces in your favorite editor. Create a new interface and set the type to OVSBridge and add the physical interface as an OVSPort. It should look similar to the below:
auto vmbr2
iface vmbr2 inet manual
    ovs_type OVSBridge
    ovs_ports enp7s0f0
Restart the networking service
service networking restart
Now that the bridge is available in Proxmox, you have to add your Security Onions interface to it. Proxmox creates a tap interface for the VMs that it hosts so you can find your VMs interface with a simple "ifconfig". The naming convention is tap-VM number-i-interface number. For mine it was tap10000i1.
tap10000i1: flags=4419<UP,BROADCAST,RUNNING,PROMISC,MULTICAST>  mtu 1500
    ether 16:b3:72:aa:39:a9  txqueuelen 1000  (Ethernet)
    RX packets 1  bytes 90 (90.0 B)
    RX errors 0  dropped 0  overruns 0  frame 0
    TX packets 225617  bytes 203347587 (193.9 MiB)
    TX errors 0  dropped 0 overruns 0  carrier 0  collisions 0
To finally add the interface, we need to use the instructions available on the the Open vSwitch website. My command was the following:
ovs-vsctl -- --id=@p get port tap10000i1 \
-- --id=@m create mirror name=sopan1 select-all=true output-port=@p \
-- set bridge vmbr2 mirrors=@m
An important note to make, is that because you need the tap the VM is using, the Security Onion instance MUST be running prior to running the OVS command. Later, this created some confusion for me as this command does NOT survive a reboot and had to be performed again, and then again when I actually started the VM. I solved that problem by discovering a similar article by "vext" in his Proxmox / Security Onion write up. I ended up ripping off his idea and used his script and added it to my crontab for an easy, repeatable, and reliable reboot.